Wednesday, August 5, 2009

Blueberry Cobbler = Summer :)

It's been a while.. I have been cooking...just have been too busy to take some time out and create a post :D


Yesterday, I made a delicious blueberry cobbler for a BBQ I attended... admittedly I had never made the recipe and I realize it's a risk to do a recipe for the first time with a group of people. Though, this time at least, no one complained! I have to say I was happily surprised at how well it turned out!


I turned to the Joy of Cooking [which is slowly becoming my fav cookbook] and found the recipe for Blueberry Cobbler on page 896. One thing I found interesting is that the recipe did not use any lemon juice/zest/etc. Instead, it used lime zest - which really brings out the flavor of the blueberries. I also used JOC's recipe for Sour Cream Cobbler Biscuit Dough, but used plain yogurt instead of sour cream. Delicious!


With the leftover heavy whipping cream, I made some homemade whipped cream to put on top:


Lime Whipped Cream


• 1 c Heavy whipping cream
• 3 T Sugar
• 1 t Lime zest


A great tip I found in making homemade whipped cream is to put the beaters and metal bowl in the fridge beforehand. It helps keep the cream cold which helps it to whip. If you are using a hand mixer, beat the cream by itself on high until soft peaks start to form. Once you have soft peaks add the sugar and lime zest. Beat for a little longer until you have the desired thickness. Be careful though - if you over whip, your cream may taste more like butter :)


I would post the recipes I used, but feel I would infringe on copyright! The Joy of Cooking may not have many pictures, but it does have some incredible recipes!!


Enjoy!


-jp

Monday, June 15, 2009

Cupcakes are the best!

I was recently watching Martha Stewart... can't say I do it all the time :P... and it happened to be the day of her cupcake show! I had been tempted to buy the magazine off the rack in stores when it had a heart made out of yummy cupcakes :D

For the show she tried a bunch of cupcakes from different cupcake shops in New York and picked out three that she liked best. All looked amazing and I madly scrambled to write down the ingredients only to remember that - oh yeah Martha is on the interwebs... Check out the recipes and video here --> Martha's Cupcake Show

Fantabulous!!

The different people she had on the show had really great tips on how to make the batter exactly how you want it, fluffy or moist or spongy...etc.

Recently, I created what was supposed to be a pound cake from a recipe on the back of a Duncan Hines box but instead ended up with an amazingly fluffy cake-like brownie. The only thing I changed was beating the eggs by themselves on high for a few minutes. Then I added the rest of the ingredients. [ The box wanted me to unceremoniously dump all of the ingredients together at the same time ... ugh] From the show I learned a lot about how to mix a great from-scratch batter.

Happy Baking :)

PS..
This recipe from Paula Deen has been my go-to cake recipe for all of the recent functions I have been attending - AHHH mazingly delicious!! The only thing I have edited is the amount of confectioner's sugar she puts in the icing - I use only 3-4 cups vs. her 7 cups. It tastes just right and isn't too sweet. I am sure substituting peach for all of the strawberry items would be just as tasty... I am hoping to try some other ones soon :D

Its most recent incarnation was cupcakes for my husband's students' piano/guitar recital... :) I used the leftover strawberry puree from the icing in some lemonade we were serving - voila! Yummy strawberry lemonade :)


Wednesday, May 27, 2009

Goofed up Snickerdoodles....

One thing I brought with us camping was a batch of Snickerdoodles to share. I love Sunset magazine and purchased their special "best ever cookies" edition when it came out this last holiday season. This is the first recipe I've tried from it and I was not disappointed... and it went over well with our camping group :)


[disappointing picture...ugh... but I think you get the jest :)]

I also goofed up on this recipe, and I don't know if it made a significant difference in the density or moisture of the cookies or not. Most of the ladies that tried them remarked that they tasted a LOT better than your traditional type of snickerdoodles, so I am guessing it was a good thing :)

Goofed-up Snickerdoodles :D
makes about 60 cookies
• 1 cup [1/2 lb] butter @ room temperature
• 1 cup vegetable oil
• 1.5 cups granulated sugar
• 1 cup powdered sugar
• 2 large eggs
• 4 1/4 cups all purpose flour
• 1 teaspoon baking soda
• 1 teaspoon cream of tartar
• 1/2 teaspoon salt
• 1 tablespoon ground cinnamon

• In a bowl, with an electric mixer on medium speed, beat butter, oil, 1 cup granulated sugar [save the extra 1/2 cup for later] and the powdered sugar until very smooth. Beat in eggs until well blended, scraping down sides of bowl as needed.
• In another bowl, mix flour, baking soda, cream of tartar, salt, and cinnamon with a fork until well blended.
• Add the flour mixture to the butter mixture and stir or beat until blended.
• Put remaining 1/2 cup of sugar into a small bowl. Shape dough into 1 inch balls, then roll in sugar. Place balls 3 to 4 inches apart on buttered or cooking parchment- lined baking sheets.
• Bake in a 375º F oven until edges of cookies are lightly browned, 12 - 15 minutes.
• Using a spatula, transfer cookies to racks to cool completely.

Enjoy!

Cream Cheese Poundcake!!! mmmmmm...

so... I have a bit of catching up to do :)

two weeks ago, I went over to Borders and caught up on a lot of reading material... using it as a more up-to-date library with a cafe inside - what could be better??

I found some excellent books on a lot of things, but stumbled across Sticky, Chewy, Messy, Gooey by Jill O'Connor.... wow.. the pictures alone made me drool :d I accidentally altered her recipe for pound cake, but it still came out delicious! The original recipe calls for 3 sticks of butter, and I only used one. I imagine the tops of my loaves would have been more cracked and beautiful like hers if I had used 3 sticks... I would highly recommend checking this book out - great tips and amazing desserts!


Cream Cheese Pound Cake
• 1 stick of unsalted butter
@ room temperature
8 ounces cream cheese @ room temperature
3 cups sugar
• 1/2 teaspoon salt
• 2 teaspoons vanilla extract
• 6 large eggs
• 3 cups flour,
sifted & then measured [it does make a difference... sifted flour is fluffier than flour just out of the bag, so if you don't sift, you will add more flour than the recipe calls for - which is never a good thing... I measured and sifted it into a separate bowl with a pouring spout- which makes it easier when you are ready for it in the recipe]
1 teaspoon baking powder

• Preheat oven to 325º F. Spray two 8.5 x 4.5 inch loaf pans with nonstick cooking spray.
• Beat butter and cream cheese together in a large bowl with an electric mixer until smooth and creamy. With mixer running [in my left hand], gradually add pre-measured*
sugar beating until pale and fluffy.[*kind of hard to measure and keep a hand-mixer running at the same time... if you can recruit help... AKA a roommate or husband :)... even better!] Beat in salt and vanilla.
• Add eggs one at a time, beating well after each one until it is fully incorporated into the mix. This is the last step you will need your mixer for...
• Sift flour again along with baking powder into batter. I used a colander/strainer to sift my flour since I do not own a sifter. This video on YouTube shows you how to do this. Using a large rubber spatula, fold the flour and baking powder into the batter until no traces of flour remain and batter is smooth.
• Divide the batter between the two loaf pans. Bake until tops are golden and slightly cracked and when a skewer inserted into the center comes out with only a few moist crumbs clinging to it, 60 - 75 mins.
• Transfer to a wire rack and let cool in pans for 10 minutes. Then turn cakes out of pans and let cool to room temperature on wire racks before serving

Cakes can be stored at room temperature for up to 3 days or frozen for one month.

I apologize for the lack of photos... but between not being able to control the focus, not being able to control exposure, using up entire batteries while taking only 40-60 photos [and not rechargeable ones, mind you]... and maybe a hint of laziness :)... I have decided to stop taking pictures of each step. For now at least.

While I was waiting for the pound cakes to bake, I realized that I had some frozen strawberries and cherries in my freezer. So I decided to make up a recipe for some fruit sauce to go with - unfortunately I didn't document it very precisely, so the following recipe is my best guess...

Cherry Strawberry sauce
• 1 Tablespoon butter
• 3/4 cup frozen strawberries
• 3/4 cup frozen cherries
• 2 Tablespoons balsamic vinegar
• 3/4 cup sugar
• 1 Tablespoon water
• 1.5 teaspoons cornstarch

• Melt butter in a saucepan over medium heat. Once the butter is melted, add cherries and strawberries. [If you would prefer to use other berries, just make sure that you substitute using the same amount]
• Add balsamic vinegar. It sounds weird, but the vinegar really brings out the flavor of berries. Add the sugar and stir.
• Allow the mixture to come to a boil, stirring occasionally. I was hoping that the sugar alone would thicken the sauce, but it was taking it a while. So I went to my trusty friend - the Joy of Cooking - and found a recipe for a fruit sauce that added water and cornstarch at the end to thicken it.
• When your sauce has been boiling for about 3 or 4 minutes, mix the water and cornstarch in a small bowl until combined. Add the cornstarch mixture to your fruit sauce and stir until it starts to thicken... about one minute.
• Remove from heat and let cool slightly. Place into an open container until cooled completely.
• It is almost like a jam, so I served it over the pound cake cool or at room temperature and stored it in the refrigerator when not in use.

Enjoy!


Saturday, May 16, 2009

Sorry for the delay... :P

I have some more recipes in store for you all, but I had to test them out first and make sure they were delicious. No sense in wasting anyone's time :)

Here is a preview of what is to come!! [inspired by bakerella]


stay posted!! :D

Saturday, May 9, 2009

Exotic Salmon Patties with Coconut Curry Sauce...

I don't know what it is about the word 'patty'... maybe a reminder of some terrible cafeteria food or something that has freezer burn... but I really tried to think up another word to replace 'patties' for this recipe. I even tried looking it up at Thesaurus.com, but it made other recommendations for the word I was trying to find... at the top of the list - panties....

Anyways, I put 'exotic' at the front which hopefully intrigues you enough to try this one out on your own :D

And this time I have photos to share... wooooo!

This recipe is one I modified from existing recipes... the sauce is pretty unmodified and can be found in the good 'ole Joy of Cooking cookbook on page 508 - "Broiled or Grilled Shrimp or Scallops with Coconut Curry Sauce".


'Exotic' Salmon Patties:
• 1 beaten egg
• 1/4 cup unsweetened coconut milk
• 1/4 cup chopped celery
• 1/4 cup chopped, water chestnuts

• 1 teaspoon curry powder
• 1/4 teaspoon black pepper
• 1 14 3/4 oz can salmon, drained, flaked and skin and bones removed

• 1/4 cup fine dry bread crumbs
• 1 Tablespoon cooking oil
• 1 recipe Coconut curry sauce [recipe follows]

Since the sauce takes about 20 minutes, I would recommend starting with preparing the sauce.


Coconut Curry Sauce:
• 1/2 cup unsweetened coconut milk
• 1/4 cup lime juice, fresh if possible
• 1 tablespoon curry powder
• 1 teaspoon dried red pepper flakes, if desired [as the curry powder already makes this sauce fairly spicy... but if you like spice, bring it ON!!]

Combine the first three ingredients in a saucepan. Bring to a boil over high heat, then immediately reduce the heat to low.


Simmer, uncovered, for 20 minutes, stirring occasionally. The sauce becomes thick and starts sticking together right around 15 minutes - that is when I added a dash of the red pepper flakes. Then I let it continue to simmer for another five minutes.

Place a spoonful to the side of the patty on the plate, almost like wasabi for sushi - use it just to dip because it is SPICY :P

[these pics show the progression of the sauce as it reduces - the last pic right before I removed it from the heat]


Now that your sauce is on its way... Combine the egg, coconut milk, celery, water chestnuts, curry powder, and pepper in a medium bowl.


-a side note about coconut milk... the brand I have found has a better lip on the bottom for using a can opener - the milk and oil naturally separate, so shake the can well before opening or stir it with a spoon after opening.


I also found that the salmon bones are quite hard to remove outside of the backbone. I was able to remove most of them, but a few still got through. As long as they are tiny I don't believe they can cause any harm.


Once you are finished removing the bones, add the salmon and bread crumbs; mix well with a fork.


The consistency should look something like this when you are through:


Form the mixture into six 1/2-inch-thick patties.


Place a skillet on medium heat and add the tablespoon of oil. Let the oil heat up before adding your salmon patties.


Let them brown on both sides - about 6 to 10 minutes total turning once. Once flipped, I smashed each patty down gently with my spatula. They will crumble if you press too hard :)


Once the first three are done, place them on a plate and cover with tinfoil to keep warm until ready to serve. After the second three are done, serve immediately as they don't stay hot for long!


Mmmm! Dinner :P

I will be making Beach Mix tomorrow, so look for an update to the previous post soon!

Thanks for following :)

Thursday, May 7, 2009

Beach Mix... delicious breakfast fast!

**Update** pics now added :)

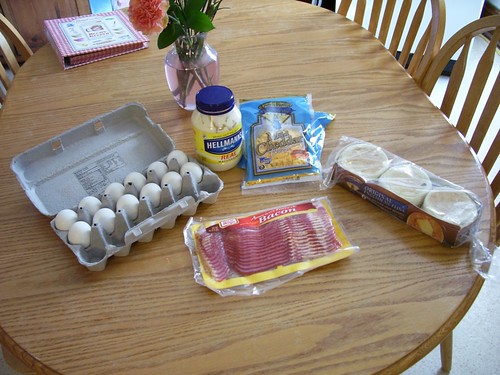
This is a great recipe for those who like a bacon and eggs breakfast, but who don't have a lot of time. Make it on the weekend and then enjoy it for the week!


Beach Mix:

• 2 pkg english muffins
• 1 dozen hard boiled eggs
• 1 - 8 oz bag shredded cheddar cheese
• 1 lb. cooked bacon crumbled [ you can also use 1 lb. of breakfast sausage... very tasty]
• enough mayo to hold the ingredients together... usually a couple heaping tablespoons do the trick

Put eggs in pan and add water just until covered. Add kosher salt.


Bring to a boil, then boil 10 minutes. Drain water and let cold water run over eggs in pan for a few minutes and add ice. Let stand 10-15 mins.

As you are waiting on the eggs, cut your bacon into 1" slices.


There are many different ways to prepare bacon... Because this recipe calls for a pound of bacon, I used the griddle since it has more space than any of my skillets.


As you can see, I set the temperature to 400 degrees. I also used tongs since bacon likes to pop... keeps my little fingers from getting really hot grease on them :)

When the bacon pieces are finished, place them on a plate with napkins or paper towels to drain off the excess grease.


Peel eggs and dice them into a large bowl.


Add cheese and bacon. Stir in enough mayo to hold the ingredients together.


The consistency should look something like this...


Place a scoop of the mix [1/4 cup] on top of an english muffin.


Broil in oven until hot and golden [ about 7-10 mins]


You can store the unused mix for about 3-5 days.

Enjoy!!

Cooking is awesome...

So... being one that loves to cook and bake, and stalking several awesome baking blogs [ Bakerella, Fresh from the Oven, Omnomicon makes, and the Pioneer Woman Cooks to name a few...] has inspired me to start sharing some recipes...

It all stems from my mother. She is the middle child of 7. After her older sister was married, her mom went back to work and her job as a 13 year old was to start making dinner as soon as she got home from school. My dad was glad that she knew how to cook, but his only complaint was all of the re-runs... she only knew how to cook for 8 :D

Growing up she involved my sister and I in all of the cooking and baking. She is the type of woman who can make things up and modify as she goes and comes out with something delicious. It makes it easier to try new recipes and make substitutions as I go... I don't have quite the experience she does, but my husband has yet to complain :)

I hope to share some of the great recipes from my mom as well as some of the new ones that I have found - some of which I have modified. [ I will be sure to let you know some of the great sources that I have pulled from ]

Thanks for following!